Convert time zone in MySQL, Angular, and Go
MySQL:
#SELECT userTimezone FROM USER_PREFERENCE WHERE uid = 1;

SELECT
UploadFileID
, UserID
, Filename AS OrigFilename
, CONCAT(Filename, ' <=== this is my filename') AS Filename
, FilenameHashed
#, CreateTime AS OrigCreateTime
, CONCAT(CreateTime + INTERVAL +8 HOUR, ' UTC') AS CreateTime
FROM UploadFile
ORDER BY UploadFileID DESC
Angular(Client side):
Do it in display side. Convert rawdata is usually not a good practice.
To solve this problem, you need to locate the mysql folder in your xampp installation. This is usually just one version, so you may find it (with a default installation path) in C:\xampp\mysql\data. This folder contains mainly logs and all the databases on MySQL.
2. Backup Log files and delete them
Create a copy of the log files of mysql, namely the files ib_logfile0 and ib_logfile1. These files are log files created during the runtime for InnoDB. Normally, removing them will solve your issue as they will be created later, however create a security copy of those files somewhere else, so in case that it doesn't work, you can still restore them and leaving xampp as it was from the beginning.
Once you have a copy of those files somewhere else (other directory), delete them from the original directory and proceed with the next step.
3. Restart MySQL and Apache
As final step restart the MySQL and Apache services in case they are running with the xampp control panel. After restarting those services, try to access again PHPMyAdmin at the URL http://localhost/phpmyadmin and you should be able to use PHPMyAdmin again.
#include <iostream>
using namespace std;
class CStudent {
public: int nAge;
};
ostream&operator<<(ostream& o, const CStudent &s) {
 o << s.nAge;
 return o;
}
int main() {
 CStudent s;
 s.nAge = 5;
 cout << s << "hello";
 return 0;
}
class Bug {
private:
 int nLegs; int nColor;
public:
 int nType;
 Bug(int legs, int color);
 void PrintBug() { };
};
class FlyBug : public Bug { // FlyBug是Bug的派生类
 int nWings;
public:
 FlyBug(int legs, int color, int wings);
};
Bug::Bug(int legs, int color) {
 nLegs = legs;
 nColor = color;
}
//错误的FlyBug构造函数:
FlyBug::FlyBug(int legs, int color, int wings) {
 nLegs = legs; // 不能访问
 nColor = color; // 不能访问
 nType = 1; // ok
 nWings = wings;
}
//正确的FlyBug构造函数:
FlyBug::FlyBug(int legs, int color, int wings) :Bug(legs, color) {
 nWings = wings;
}
#include <iostream>
using namespace std;
int main ()
{
// 声明简单的变量
int i;
double d;
// 声明引用变量
int& r = i;
double& s = d;
i = 5;
cout << "Value of i : " << i << endl;
cout << "Value of i reference : " << r << endl;
d = 11.7;
cout << "Value of d : " << d << endl;
cout << "Value of d reference : " << s << endl;
return 0;
}
Process sensors: petrochemical, pharmaceutical and semiconductor industries
Position sensors: vehicles and air crafts
Motion sensors: smartphone and security systems
Ergonomic sensors: tablets, PCs, and phones
Chemical sensors: protect from fire and toxic vapor hazards
Electrical sensors: lab instruments and security systems
The output of the ADC is typically 8, 12, 16, or 24 bits. Data from an 80C is usually converted to a serial format such as I2C, spy, or RS 232.
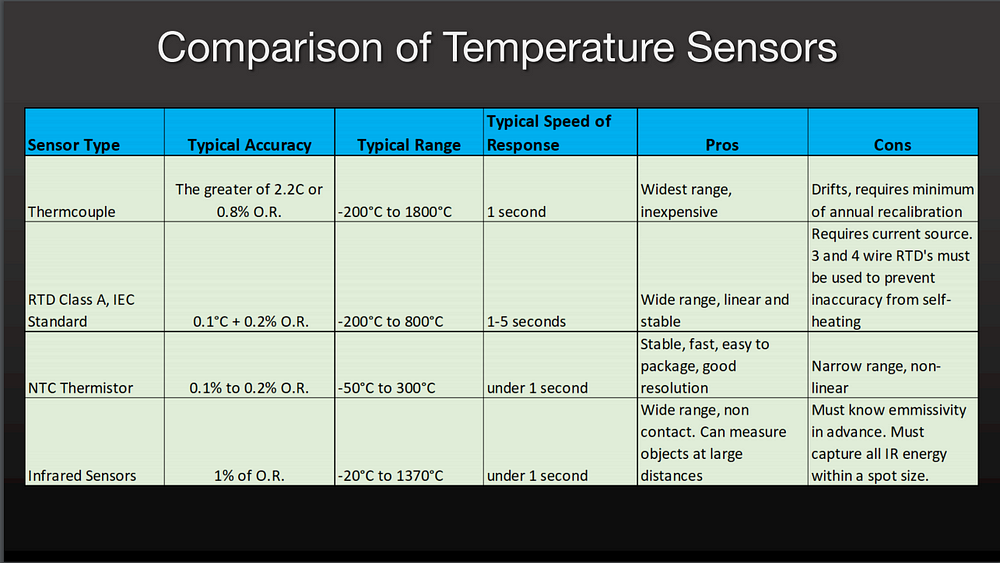
Thermal sensors:
Thermocouple: up to 1800 degrees Celsius
RTD resistance temperature detector: the resistance of metal increases as the temperature increases. For platinum, all most linear. More precise. up to 800 degrees Celsius.
Thermistor: entered semi-conductor or metal oxide particles
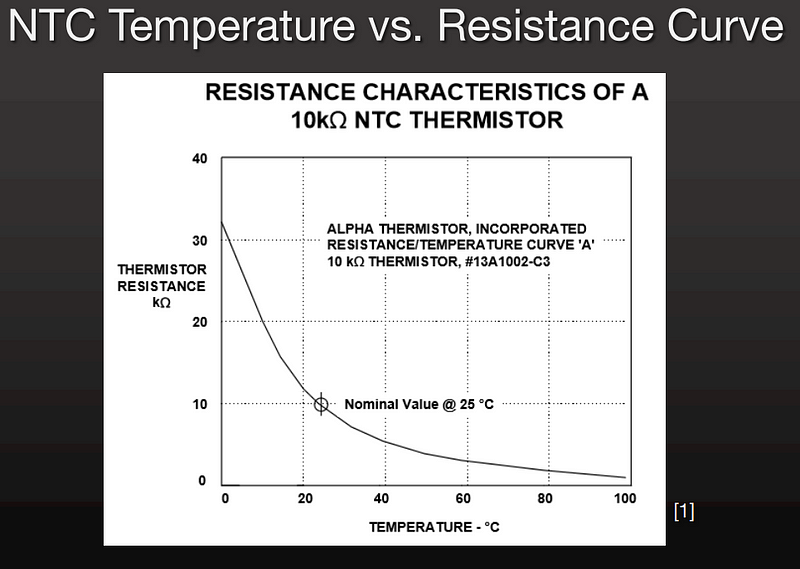
NTC thermistor: exhibit a large decrease in electrical resistance for a relatively small increase in temperature. Their small package size makes them ideal for measuring temperature in phones and computers.
Infrared sensor: the only non-contact temperature sensor.
Thermistor:
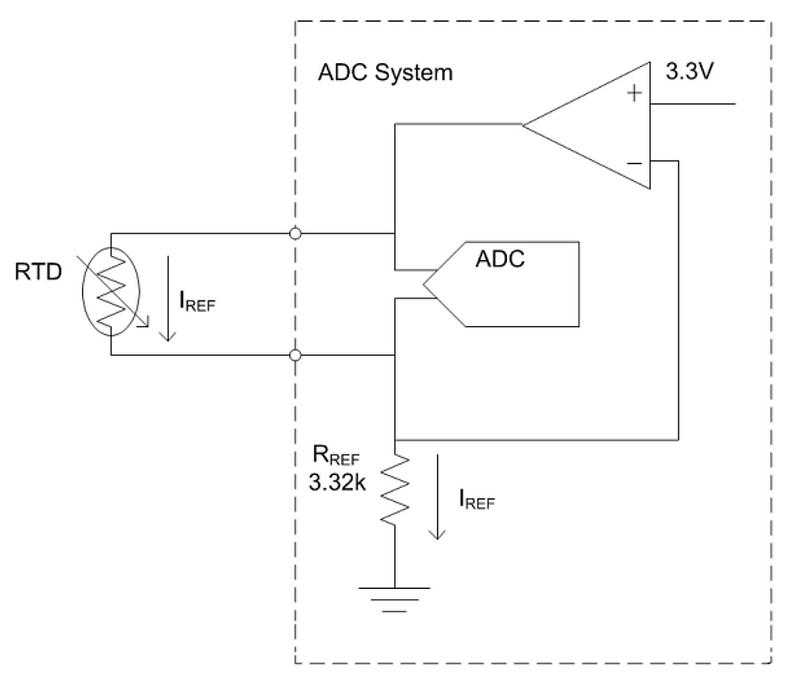
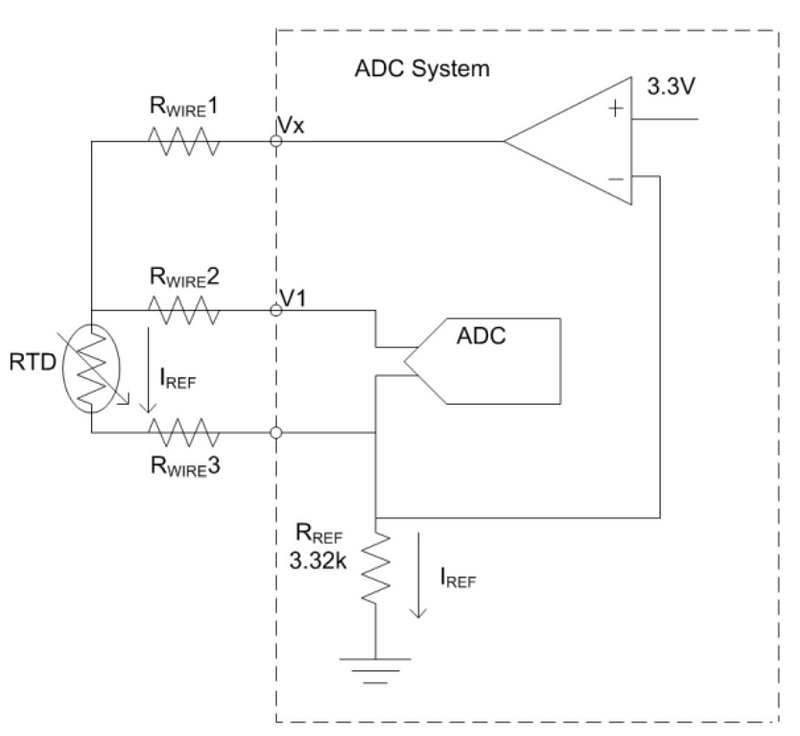
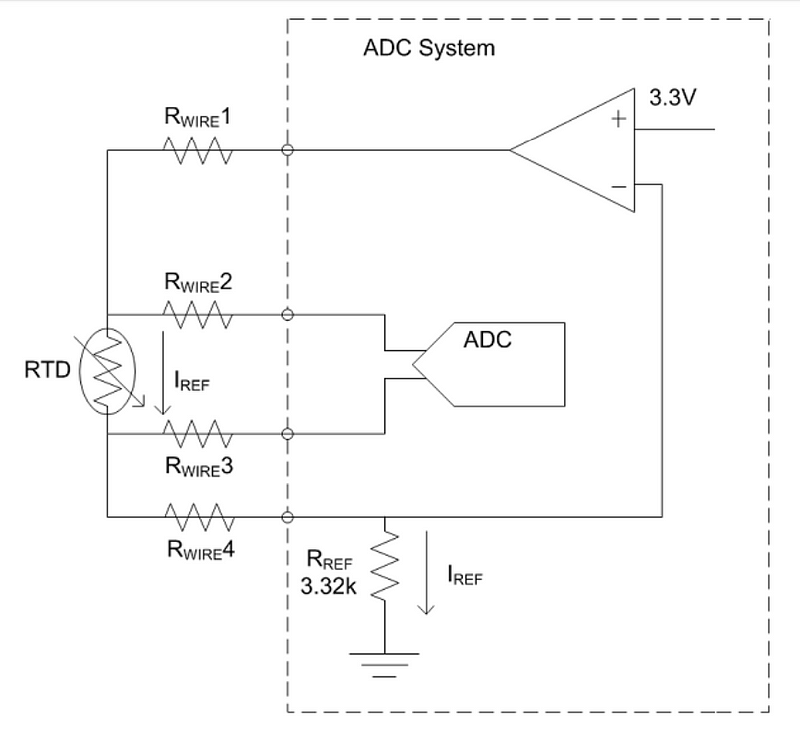
Why RTDs needs four-wire connection to keep accuracy?
For two-wire resistance measurements, the RTD’s lead wires’ resistance will affect the measurement accuracy. The value will be RTD + 2 x Rwire.
For three-wire resistance measurements, the return lead wire’s resistance will affect the accuracy of resistance measurement. The value would be RTD+Rreturn lead wire. Roughly reduces half error.
For four-wire resistance measurements, there is no current through Rwire2&Rwire3. Therefore, the voltage measurement is accurate. Then, the resistance value of RTD is accurate.
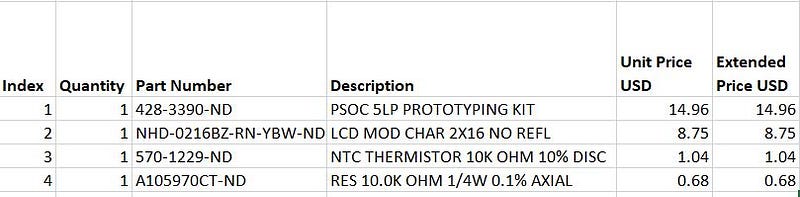
These are the part numbers typed out, so you can copy and paste them into the Digikey web site:
428–3390-ND
NHD-0216BZ-RN-YBW-ND
570–1229-ND
A105970CT-ND
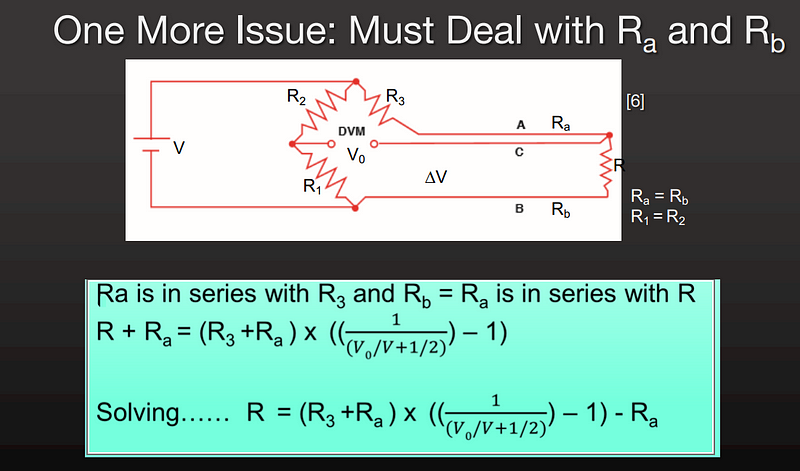
Resistance calculation for RTD
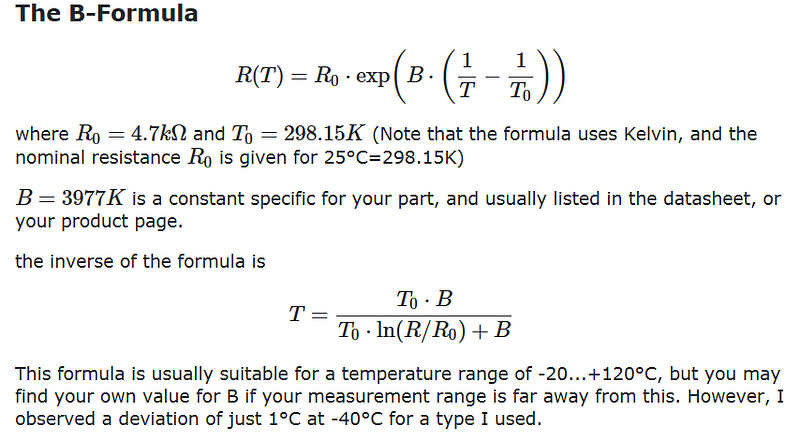
NTC thermistors can also be characterised with the B (or β) parameterequation, which is essentially the Steinhart–Hartequation with , and , where the temperatures are in kelvins, and R0 is the resistance at temperature T0(25 °C = 298.15 K).
Rotary Sensor
Type1: Incremental encoder- generates pulses to measure angular speed. Used for motor speed, rate control, and cutting devices. Found in robots, grinders, drills, lathes, and mixing equipment.
Note: good for measuring speed, not for absolute position
Type2: Absolute encloder- generates multi-bit digital words that indicate actual position directly. Used for measuring and positioning. Found in milling machines, robots, plotters, ultrasonic welders and medical equipment.
Note: always know where it is during rotation and it can also keep track of total revolutions.
Type3: Resolvers- generates a voltage corresponding to absolute angular position, per the interaction of magnetic fields of a rotor and stator. Used for extreme temperature, shock, and vibration conditions in military, aerospace, and construction equipment.
ROM(read only memory): ROM, P(programmable)ROM, E(erasable)PROM, E(electrical)EPROM, FLASH EPROM (USB)
EDO(extended data out) DRAM
S(synchronous)DRAM
DDR(double data rate SDRAM)
CPU的指令集:Intel X86, ARM
汇编语言--assembly language
小结:
程序必须要经过编译才能转换成CPU所能接受的指令;
一句程序有可能转换为多句指令;
在控制器的协调下连续、依次执行相应的指令;
程序执行过程是在内存中完成的;
程序在执行过程中,在内存中的不同区域,存放代码和相关的数据;
EX1:
// Example program
#include <iostream>
using namespace std;
int main()
{
 int x = 0, y = 0, z = 0, t1 = 0, t2 = 0;
 while (x < 34) {
  while (y < 51) {
   while (z < 101) {
    t1 = x + y + z;
    t2 = 2 * x + 4 * y + z;
    if (t1 == 100 && t2 == 200) {
     cout << x << " " << y << " " << z << endl;
    }
    z++;
   }
   y++;
  }
x++;
 }
 return 0;
}
EX2:
// Example program
#include <iostream>
using namespace std;
int main()
{
 int items[10]={4,2,7,1,6,9,5,3,8,3};
 int tmp=0;
 for(int i = 0;i<10;i++){
     cout<<items[i]<<" ";
     }
 for(int i=0;i<10;i++){
         for(int j = i; j<10;j++){
             if(items[i]<items[j]){
                     tmp = items[i];
                     items[i]=items[j];
                     items[j]=tmp;
                 }
             }

     }
 cout<<endl;
 for(int i = 0; i<10;i++){
     cout<<items[i]<<" ";
     }
 return 0;
}
学习一门程序设计语言
数据成分:有哪些数据类型?如何使用?
运算成分:有哪些运算符号?如何使用?
控制成分:三种类型的控制语句是如何写的?
传输成分:在程序中如何输入和输出数据?
// Example program
#include <iostream>
using namespace std;
int main()
{
 cout<<"sizeof(short int)="<<sizeof(short int)<<endl;
 cout<<"sizeof(int)="<<sizeof(int)<<endl;
 cout<<"sizeof(long int)="<<sizeof(long int)<<endl;
 return 0;
}
赋值运算总结:
两边类型不用:自动完成类型转换
常数赋给短数:截取长数的低位送给短数
短数赋给长数:保持不变
符号位的赋值处理:直接赋值,不管符号位还是数字位
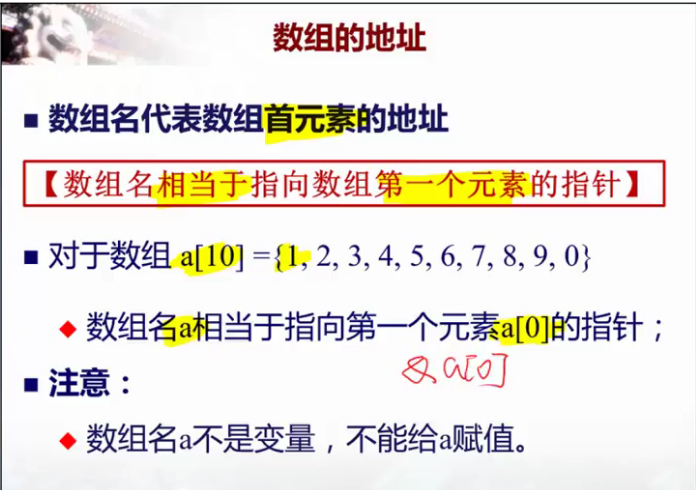
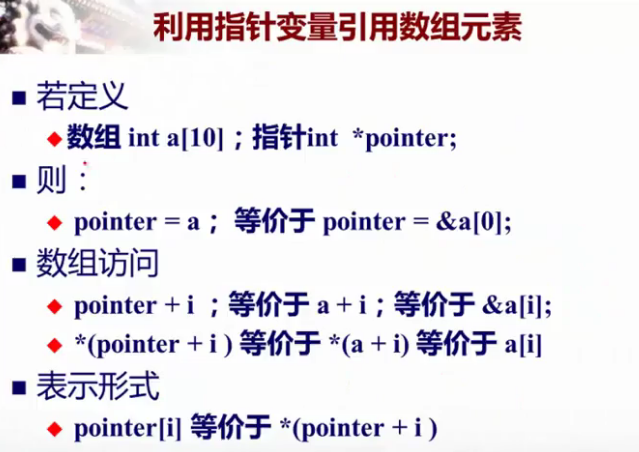
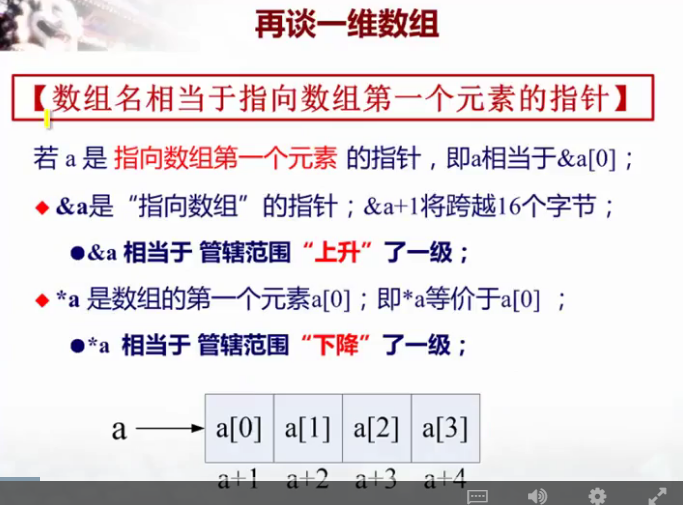
定义数组的长度
#include <iostream>
using namespace std;
#define N 4
int main() {
int a[N] = { 1,2,3,4 };
for (int i = 0; i < N; i++) {
cout << a[i] << endl;
}
return 0;
}
允许定义:
int a[] = {1,2,3,4};
都一样:
int a[4] = {0};
— — — — — — — — —
cout << setw(3) <<a[i][j]; //输出占三个字符位
— — — — — — — — —
#include <iostream>
#include <cmath>
using namespace std;
int main() {
int sum = 0, a[100] = { 0 };
for (int i = 2; i < sqrt(100.0); i++) {
sum = i;
if (a[sum] == 0) {
while (sum < 100) {
sum = sum + i;
if (sum < 100)a[sum] = 1;
}
}
}
for (int i = 2; i < 100; i++) {
if (a[i] == 0)cout << i << " ";
}
return 0;
}
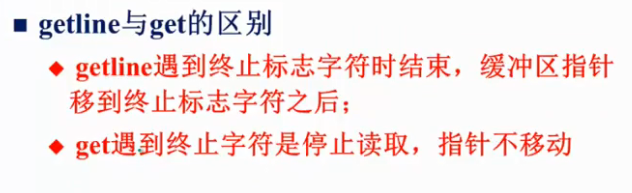
int main()
{
    char a[10][10];
    int n = 0;
    cin >> n;
    cin.get(); //read n first
    for(int i = 0; i < n; i++)
        cin.getline(a[i],10);
    for(int i = 0; i < n; i++)
        cout << a[i] << endl;
    return 0;
}
There are two common methods to convert strings to numbers:
Using stringstream class or sscanf()
stringstream() : This is an easy way to convert strings of digits into ints, floats or doubles. Following is a sample program using a stringstream to convert string to int.

// A program to demonstrate the use of stringstream
#include <iostream>
#include <sstream>
using namespace std;

int main()
{
    string s = "12345";

    // object from the class stringstream
    stringstream geek(s);

    // The object has the value 12345 and stream
    // it to the integer x
    int x = 0;
    geek >> x;

    // Now the variable x holds the value 12345
    cout << "Value of x : " << x;

    return 0;
}
— — — — — — — — — —
#include<stdio.h>
int main()
{
    const char *str = "12345";
    int x;
    sscanf(str, "%d", &x);
    printf("\nThe value of x : %d", x);
    return 0;
}
— — — — — — — — — —
// C++ program to demonstrate working of stoi()
// Work only if compiler supports C++11 or above.
#include <iostream>
#include <string>
using namespace std;

int main()
{
    string str1 = "45";
    string str2 = "3.14159";
    string str3 = "31337 geek";

    int myint1 = stoi(str1);
    int myint2 = stoi(str2);
    int myint3 = stoi(str3);

    cout << "stoi(\"" << str1 << "\") is "
         << myint1 << '\n';
    cout << "stoi(\"" << str2 << "\") is "
         << myint2 << '\n';
    cout << "stoi(\"" << str3 << "\") is "
         << myint3 << '\n';

    return 0;
}
— — — — — — — — — — —
// For C++11 above
#include <iostream>
#include <cstdlib>
using namespace std;

int main()
{
    const char *str1 = "42";
    const char *str2 = "3.14159";
    const char *str3 = "31337 geek";

    int num1 = atoi(str1);
    int num2 = atoi(str2);
    int num3 = atoi(str3);

    cout << "atoi(\"" << str1
              << "\") is " << num1 << '\n';
    cout << "atoi(\"" << str2
              << "\") is " << num2 << '\n';
    cout << "atoi(\"" << str3
              << "\") is " << num3 << '\n';

   return 0;
}
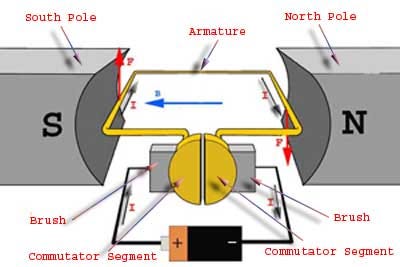
Q1: When switch closes, the current initially register a large amount of current, then the current decay to a much lesser value over time as the motor speeds up. Why?
Motor current is inversely proportional to speed, due to the counter-EMF by the armature as it rotates.
Q2:
Field: the portion of the motor creating the stationary magnetic field
Armature: the rotating portion of the motor
Commutator: copper strips where the armature coil leads terminate, usually located at one end of the shaft
Brush: a stationary carbon block designed to electrically contact the moving commutator bars